Introduction
Pi looks almost boring on first launch. A transcript, a one-line editor, a footer with folder, model, and session. No dashboard, no onboarding wizard.
That minimalism is the point. Pi is a harness, not a platform: the loop is you → active branch + tools → model → tool calls → results. Once you see that loop run once on a real folder, every advanced feature lands in the right place.
In this guide we go from zero to first real task in about 10 minutes: install, pick a working folder, connect a model, run one scoped task, and avoid the three common mistakes. No extensions, no MCP, no codemode today.
Part of the Pi Ultimate Guide. This is the hands-on entry — read the pillar for the map.
What is Getting Started with Pi
Getting started with Pi means three things and nothing else:
- Pi installed and verified (
pi --version) - Pi started in the right folder (
cd /path/to/folder && pi) so it discovers the rightAGENTS.md,.pi/config, and session group - A model connected (
/login→/model) and one small task completed so you’ve seen a full turn: read → run → edit, all visible in the transcript
Think of it like learning git: init, add, commit first. Branching strategies later.
How to Get Started with Pi
Step 1: Install Pi (pick one method)
Installer (macOS/Linux): pins all dependencies, updates with pi update.
curl -fsSL https://pi.dev/install.sh | sh
pi --version
# 1.0.4 — what this guide was tested on
npm: needs Node.js 22.19+. Doesn’t pin transitives.
npm install -g --ignore-scripts @earendil-works/pi-coding-agent
pi --version
Nix: builds from source.
nix profile add github:earendil-works/pi/stable
# update: nix profile upgrade pi (pi update won't work here)
Uninstall later: re-run installer → Uninstall, or
npm uninstall -g, ornix profile remove pi. Config/sessions in~/.pi/agent/survive uninstall. That’s intentional.
Step 2: Start in the right folder
cd /path/to/folder
pi
What happens: Pi may ask if you trust this folder before loading project resources. Say yes only if you recognize the .pi/ contents. Then you see:
- Transcript (center): prompts, responses, tool calls, results, errors
- Editor (bottom): where you type.
Entersends,Shift+Enternewline,Ctrl+Gopens your external editor for long prompts - Footer: folder, session, model, context usage, cost
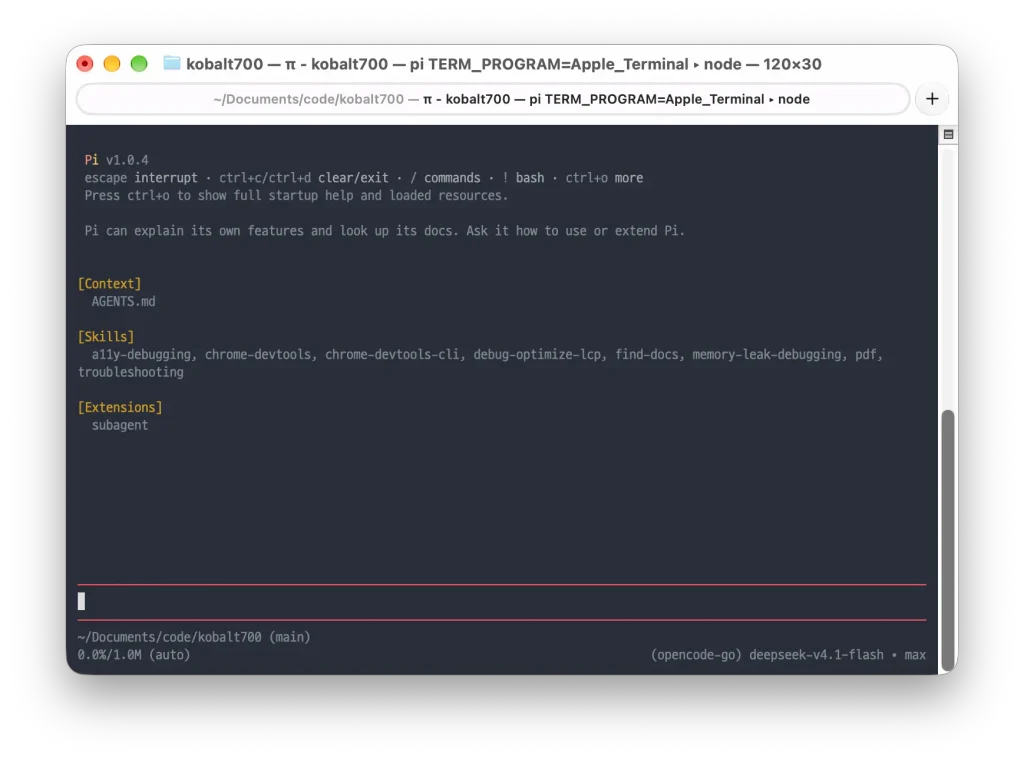
The header lists what instructions/resources loaded Read it once. If it says nothing loaded, that’s data: no AGENTS.md found here.
Tip: use a real project with a few files, not an empty dir. Pi needs something to read to show its value.
Step 3: Connect a model with /login
A model generates responses. A provider is the account/service you access it through (subscription, API key, local model).
Inside Pi:
/loginPick a provider → follow prompts (subscription OAuth or paste API key). Then:
/modelPick the model. (Ctrl+L opens the same selector. /thinking / Shift+Tab adjusts reasoning level where supported. /logout removes access.)
ENV auth and local models also work (see docs/models.md), but don’t start there. Get one interactive login working first so you know auth isn’t your problem later.
Step 4: Run one scoped task
Copy-paste one of these. Type @ to fuzzy-find a file instead of typing full paths, Tab to complete.
Summarize @meeting-notes.md and save the action items to action-items.md.Explain how this repository is structured and how to run its checks.Compare @previous.csv with @current.csv and summarize the important changes.What you’ll see, step by step:
- Pi expands
@fileinto message content (prompt template expansion) - Model requests file reads. You see each
readcall + excerpt - Maybe a
bashsearch (rg,ls) to orient - An
editorwriteif the task needs output - Final response summarizing what changed
Pi does not ask before every tool call. Press Ctrl+O to expand/collapse tool output, Ctrl+T to show/hide thinking blocks. This is the moment to build the habit: watch the calls, don’t just read the final text. For important work, use version control or backups. And for untrusted repos, run in a container.
While it works you can steer: type + Enter to adjust the current task, Alt+Enter to queue follow-up after it finishes, Esc to stop (queued messages return to editor).
Step 5: Save, resume, and name it
Pi saves sessions automatically.
/name my-first-pi-task
/session
/session shows file, ID, message/token counts, cost. Leave with Ctrl+C / exit, come back with:
pi --continue
# same folder → most recent session; /resume to pick another; /new to start fresh
Try it now: exit, pi --continue, confirm your action-items file is still referenced. That continuity is what makes Pi usable for multi-day work. Full branching model lives in the next post.
Common Mistakes to Avoid
- Starting in
~or/.
Symptom: Pi loads random context, sessions pile up in one group. Fix:cdto the project beforepi. The folder is a parameter, not decoration. - Leading with “refactor everything.”
Symptom: long run, big diff, can’t tell what was right. Fix: first task = read-only + one write (the meeting-notes example). Learn to audit 5 tool calls before trusting 50. - Skipping
/modelafter/login.
Symptom: “Pi feels dumb.” You’re often on a default/small model. Fix:/modelexplicitly, glance at footer. Model choice dominates quality more than any prompt trick. - Pasting full paths instead of using
@.
Symptom: typos, missing files. Fix:@+ fuzzy search,Tabto complete. Faster and Pi resolves it correctly into message content. - Treating tool calls as noise.
Symptom: you read only the final answer, miss a wrongbashthat poisoned it. Fix:Ctrl+Oopen on first tasks. The transcript is the review surface, but it’s your first defense.
Examples of Pi in Action
Same loop, three shapes Notice each is scoped to files you can verify:
- Notes → actions:
Summarize @meeting-notes.md and save the action items to action-items.md.Verdict in 30 seconds: open the output file. Did it hallucinate owners? That’s your quality signal. - Repo orientation:
Explain how this repository is structured and how to run its checks.Good test ofread+bash+AGENTS.mddiscovery. I run this on every unfamiliar repo now before touching code. - Terminal shortcut:
!git statusruns a command and includes output;!!git log --oneline -5runs without sending to the model. Use!when you want Pi to see it,!!when it’s just for you.
Additional Resources for Pi
Official (read in this order):
- Quickstart: install/start/model/task + customization chooser table (
AGENTS.md→ prompt → skill → extension → package) - Use Pi in the terminal:
!commands,/copy /export /share,/settings,/debug→pi-debug.log(scrub before sharing — contains prompts/files/creds) - Choose a model and provider: subscriptions, keys, local, custom endpoints
In this cluster:
- Theory: Harness Engineering notes — why the harness, not the model, is the product
Closing
You now have the only three things a beginner needs: installed Pi, a trusted folder, a working model, and one audited loop under your belt. Everything else is leverage on that loop.
Do one real task today with files you care about.
Call-to-Action
Stuck? Drop OS + install method + pi --version + where it failed (install / trust prompt / /login / first task) in the comments.