AI assistants are only useful as what they can reach, and for most WordPress site owners that has meant copying and pasting between a chat window and wp-admin. WordPress’s official MCP Adapter removes that step. It lets clients like Claude work with your site directly, whether that means reading site details or creating draft posts.
This guide is for WordPress owners, developers, and content teams who want to try AI-assisted workflows without building a custom integration.
In this post, we’ll walk through installing the MCP Adapter, creating an application password, and connecting Claude Desktop.
What Is the MCP Adapter, and Why Does It Matter?
Three pieces work together here:
- MCP (Model Context Protocol) is and open standard that lets AI apps like Claude connect to outside tools and data in a consistent way. Instead of every app building its own integration, a tool exposes itself once as an MCP server and any compatible client can use it.
- The Abilities API is WordPress’s built-in way (as of 6.9) for plugins and core to register the things the site can do, such as “create a post” or “get site info”. Each ability has a name, a description, and a defined set of inputs and outputs/
- The MCP Adapter is the official plugin that connects the two. It takes the abilities registered on your site and exposes them over MCP, so an AI client can discover them and call them.
Out of the box, the adapter gives clients three tools: one to discover abilities, one to get the details of a specific ability, and one to execute it. The adapter doesn’t decide what the AI can do. The abilities you register do.
Why It Matters
- No more copy-paste: AI can act on your site directly instead of handing you text to move into the dashboard.
- You control the scope. AI can only do what has been registered as an ability, and only with the permissions of the WordPress user it logs in as. A create-post ability that defaults to drafts, for example, keeps a human in the loop before anything goes live.
- It’s built on standards. Because it uses MCP and WordPress’s own API, the same setup works with other compatible clients, not just Claude.
What You Need
- WordPress 6.9 or later, on a site with HTTPS
- Claude Desktop and Node.js (for
npx) - An admin account to create the credentials
1. Install the plugin
Install and activate MCP Adapter from the plugin directory.

Find the plugin “MCP Adapter” by WordPress.org
Or with WP-CLI:
wp plugin install https://github.com/WordPress/mcp-adapter/releases/latest/download/mcp-adapter.zip --activate2. Create an application password
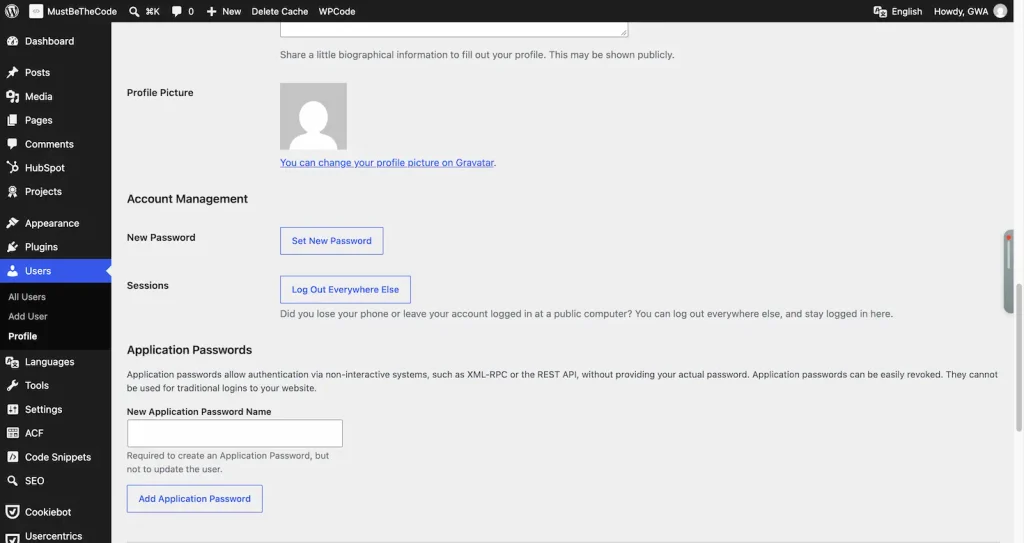
Go to Users → Profile → Application Passwords, name it “Claude”, and copy the password. Use a dedicated user with only the permissions you want the AI to have, because the password carries that user’s capabilities.
3. Configure Claude Desktop
Go to Settings -> Developer -> Edit Config

Add this to claude_desktop_config.json:
{
  "mcpServers": {
    "wordpress": {
      "command": "npx",
      "args": ["-y", "@automattic/mcp-wordpress-remote@latest"],
      "env": {
        "WP_API_URL": "https://your-site.com/wp-json/mcp/mcp-adapter-default-server",
        "WP_API_USERNAME": "your-username",
        "WP_API_PASSWORD": "your application password"
      }
    }
  }
}
Fully quit and reopen Claude Desktop, then start a new chat.
4. Test it
Ask Claude to call mcp-adapter-discover-abilities. A working setup lists the abilities your site exposes. Out of the box that’s only a few read-only core ones (site info, user info, environment info).
Troubleshooting: The 401 Rest_Forbidden Error
My first attempt failed with a 401 even though the plugin was working. The cause was an http:// URL. WordPress disables application passwords on non-HTTPS sites, and redirects can drop the Authorization header. Switching WP_API_URL to https:// fixed it. If you still see 401, check the username, the full password, and any security plugin or host rule that strips auth headers.
5. Add real abilities
The adapter only bridges abilities. Plugins or your own code must register them, for example a create-post ability that makes draft posts.
Here is an example from the plugin repository
https://github.com/WordPress/mcp-adapter/blob/trunk/docs/getting-started/basic-examples.md
<?php
// Register the ability
add_action( 'wp_abilities_api_init', function() {
    wp_register_ability( 'my-plugin/create-post', [
        'label' => 'Create Post',
        'description' => 'Creates a new WordPress post with the specified content',
        'category' => 'site',
        'input_schema' => [
            'type' => 'object',
            'properties' => [
                'title' => [
                    'type' => 'string',
                    'description' => 'The post title',
                    'minLength' => 1,
                    'maxLength' => 200
                ],
                'content' => [
                    'type' => 'string',
                    'description' => 'The post content (HTML allowed)',
                    'minLength' => 1
                ],
                'status' => [
                    'type' => 'string',
                    'description' => 'Post status',
                    'enum' => ['draft', 'publish'],
                    'default' => 'draft'
                ],
                'category' => [
                    'type' => 'string',
                    'description' => 'Category name (optional)'
                ]
            ],
            'required' => ['title', 'content']
        ],
        'output_schema' => [
            'type' => 'object',
            'properties' => [
                'post_id' => [
                    'type' => 'integer',
                    'description' => 'The ID of the created post'
                ],
                'post_url' => [
                    'type' => 'string',
                    'description' => 'The URL of the created post'
                ],
                'edit_url' => [
                    'type' => 'string',
                    'description' => 'The admin edit URL'
                ]
            ]
        ],
        'execute_callback' => function( $input ) {
            if ( empty( $input['title'] ) ) {
                return new \WP_Error( 'missing_title', 'Post title is required.' );
            }

            $post_data = array(
                'post_title'   => sanitize_text_field( $input['title'] ),
                'post_content' => wp_kses_post( $input['content'] ),
                'post_status'  => in_array( $input['status'], array( 'draft', 'publish' ), true ) ? $input['status'] : 'draft',
                'post_type'    => 'post',
            );

            // Handle category if provided
            if ( ! empty( $input['category'] ) ) {
                $category = get_category_by_slug( sanitize_title( $input['category'] ) );
                if ( ! $category ) {
                    // Create category if it doesn't exist
                    $category_id = wp_create_category( $input['category'] );
                } else {
                    $category_id = $category->term_id;
                }
                $post_data['post_category'] = [ $category_id ];
            }

            $post_id = wp_insert_post( $post_data );

            if ( is_wp_error( $post_id ) ) {
                throw new Exception( 'Failed to create post: ' . $post_id->get_error_message() );
            }

            return [
                'post_id' => $post_id,
                'post_url' => get_permalink( $post_id ),
                'edit_url' => get_edit_post_link( $post_id, 'raw' )
            ];
        },
        'permission_callback' => function() {
            return current_user_can( 'publish_posts' );
        },
        'meta' => [
            'public' => true, // Expose to clients, including MCP
            'annotations' => [
                'priority' => 2.0,
                'readOnlyHint' => false,
                'destructiveHint' => false
            ]
        ]
    ]);
});
You can make this as a plugin and add it to your website.
Closing
Now you can use AI to manage your WordPress website.
It is a new feature so the ecosystem around this is not that big now, so keep that it mind when finding abilities.
You can find more information on